Showing posts with label crafting. Show all posts

Monday, June 27, 2016

DIY Bottle or Jar Cleaning Brush

Bottle or Jar Cleaning brush

This is a simple project with three main parts.
You will need the following.
  1. Wooden spoon
  2. Mop yarn
  3. 4 inch foam mini paint roller
  4. Hot glue - high temp.
The tools you will need are as follows
  1. A sander of some type either belt sander or Dremel tool
  2. quarter-inch drill bit and drill
  3. hot glue gun with high temp glue.
Take the wooden spoon and sand the handle down just enough to fit inside the paint roller. Then drill 1/4 inch holes in the lower half the spoon, as shown here.
Then using a hot glue gun inject a small amount of blue inside the paint roller and long handle. Insert the handle into paint roller and immediately cool with cold water. The cold water is to keep the foam from melting and two quickset glue. Once you have glued the foam roller onto the handle it should not turn. If the roller rotates on the handle it will not do a very good job in cleaning bottles or jars. After you have assembled the foam handle you can use a crochet hook or latch hook or even micro forceps as seen here, to assemble the mop yarn. Mop yarn may be hard to come by at craft stores so I simply bought a mop from the dollar store and cannibalized it for the yarn. Yarn should be 6 to 8 inches in length and can be added to the spoon by either using half hitch knots or double knots on either side of the holes, so as to prevent the yarn from pulling through. You may want to add two or three strands per hole in order to get the right density of yarn. If you find that after assembly yarn is still too long you can simply trim with scissors. Once you have finished this your project is complete and you now have the best bottle brush ever. It's makes a great gift or a great project just for yourself.
    If you're going to make these for sale it is important to keep in mind that the cost of your materials is critical to whether it is profitable. Most of the materials were purchased at a dollar store and the cost of materials was kept under a dollar. Where you may lose some money as with any crafts is with the amount of time spent in creating the item. This may be offset by adding the item to a gift basket or similar project.  It may be possible to save a little bit of money by cutting out your own spoons out of quarter-inch wood stock. 
   

Thursday, June 23, 2016

Nevada crafter contest winner for the month of May 2016

Congratulations to Lisa Hess for being the month of May Nevada crafter contest winner.

Be sure and check our website and blogs for future contests and contest rules.
www.nevadacrafter.com

http://craft44.blogspot.com/

http://nevadacrafter.blogspot.com/

Wednesday, April 27, 2016

Contest for Nevada Crafter month of May

Nevada Crafter month of May contest

For your chance to win these 3 glass lampwork charms, great for making necklaces , bracelets or wine glass charms, all you have to do is follow or like us on one of the following.

Free Patterns and Ideas Blog

Craft 44 blog

Nevadacrafter blog


For future contests be sure and check out these sites and http://www.nevadacrafter.com

we are a Free Nevada Crafter online magazine

Monday, April 25, 2016

FREE Natural DIY Fiber Filling and Batting

I've been meaning to do this story for some time, as it actually has quite the history here in Fallon, Nevada. 
Milkweed, October 2015
    During World War II Japan cut off our supply of fiber fill (kapok) that was being used for making life vests, but a local weed came to the rescue. This plant that plagues farmers and gardeners alike is actually one of the most useful wild plants there is when it comes to textiles. My uncle told stories of kids going up and down ditch banks during the Great Depression collecting milkweed pods to sell the down. And I remember collecting monarch butterflies and yellow swallowtail butterfly caterpillar that feed on it. 
    It grows a seed pod that produces a hypoallergenic fiber fill that can be used in making pillows and stuffing quilts. The fiber is easily collected just before the pods open while the pods are still green. Pods are cracked and the seeds are raked off. You are then left with milkweed down that when allowed to dry makes an excellent fiber fill. There have also been a number of people who have experimented with combining it with other textile such as cotton or wool and then spinning that cotton or wool into yarn. (Sorry but I do not know the ratio used of cotton or wool to milkweed silk ) Unfortunately milkweed down by itself is too brittle for spinning but as I said before it has many unique and useful properties. Native Americans were also known to use the rubbery sap as a chewing gum by rubbing the sap between their fingers to make a rubber ball to chew on. Although I would not recommend it as it tastes awful and may be toxic, the white milky sap is similar to liquid latex. Fibers from the stem would also be used to weave into fishing line or cordage which was then used for making other things.
Drought and late in season, liberty pond
    It should be noted : before harvesting you should make sure that the milkweed has not been sprayed with an herbicide. If it smells funny or the leaves are brown then I would stay clear of these plants. The plants are readily found along ditch banks and ponds. And make sure you remove all the seeds, because if the seeds get wet, they will sprout.

Silky and soft to the touch
To me it is a mystery as to why this plant has not yet been commercialized, as it outperforms goose down. It is more breathable, more durable,and warmer than goose down. It also uses less water when compared to similar fiber crops. So if you’re looking for an inexpensive fiber fill this may make a
good alternative.
The green milkweed pods in the background of this photo are what you're looking to harvest just before they open 
Note green milkweed pods in background
milkweed at liberty pond

 
These beetles also make milkweed their home.
The fire and gem beetles are harmless and may be a good indicator that the plant has not been sprayed with herbicide or pesticide.

Saturday, March 19, 2016

Do you need washers for your craft projects?

Washers for whirligigs


FOR SAFETY REASONS NEVER USE THESE WASHERS TO REPLACE PARTS ON COMMERCIAL PRODUCTS. 

Always use the manufacturer's recommended replacement parts.


    Nylon washers are not very cheap, but I have found an alternative that cost next to nothing, helps the environment and works almost as well. 
    One of the things that I do on a yearly basis is to do preventative maintenance on my whirligigs and weathervane's. With all the moving parts and high winds, there is a lot of wear and tear on these mechanical wonders. What I found out is metal on wood wears out the most, so I use a lot of plastic or nylon washers. Although washers are not the most expensive part to a whirligig, they can cut into your profits.

  I couldn't help, but share this money-saving and environmentally friendly up_cycling of plastic jugs. As for the patterns, I simply invested in an assortment of metal washers to use as a template for the various size washers that I use in my whirligigs. After all for a couple of bucks worth of cheap metal washers, I now have a set of templates that are worth the investment and will never wear out. I could've very easily used a compass to draw the circles, but I wanted something that was more consistent with actual washers.

    
(Be sure to use the appropriate safety goggles and other safety equipment when using rotary tools)

    I have found almond milk jugs and other opaque or heavier jugs seem to make the better washers. Anyhow, using a metal washer as my template and a black marker to trace around the metal washer, I create my patterns. Usually, I take the time to make several hundred at a time, so I have washers on hand for later. Then I simply rough cut them using heavy-duty utility scissors, dollar store kitchen scissors or a Dremel with a fine tip rotary cutting blade. (An X-Acto knife on a cutting board will also work as well.) I then finish the washer by sanding the edges or dragging a knife blade crossways against the grain to remove any ragged edges. A Dremel with an abrasive bit also works very well.

For those of you who like to do things the hard way I have included the following photo as a pattern.
Now keep in mind these washers will not necessarily take the place of a heavy-duty nylon washer and will most likely biodegrade over time if exposed to sunlight.


 For other craft projects and ideas be sure and check out our other blogs and our website at www.nevadacrafter.com

Wednesday, February 3, 2016

DIY Drawing Compass

DIY Drawing Compass

A drawing compass can come in handy, but most are the size kids use in school. I quickly found out that here locally, there were no large compasses to be had. Not only do they come in handy for my own art work, but there is some demand for the compasses them selves. So I present the following approximate pattern and photos of the one I made. 


(Please note: pattern may not be exact or to scale and some adjustments may need to be made. The pattern is presented as an approximate to the original and is intended as more of a guide. It should also be noted that the pattern may need adjusting depending on materials used and thickness of wood or other materials used.)

Note: 1/4 " wood was used

I used glue to hold and position the mechanical pencil and metal point. I then used wire to hold them in place while the glue set and left them in place to add strength. Any point can be used for the fulcrum, such as a nail, push pin, ect. 
Of course when I am making them for sale, I take care to use much nicer material, such as brass nails, ect. The size circle you can draw depends on how long or how many joints. A second screw and wing nut in the middle of the fulcrum, but I find it just as easy to just make the compass bigger. 
    I hope this idea is of help to the crafters and artists out there that need to make big circles and great art. Thank you for taking the time to read my blog and please check out our other blogs and subscribe. Please feel free to make constructive comments or suggestions.

Thursday, December 10, 2015

Quick and easy Bottlecap refrigerator magnets

Quick and easy Bottlecap refrigerator magnets 

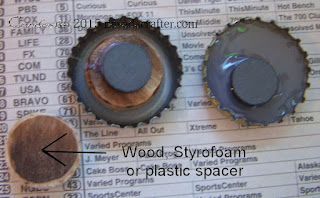
So for this project you will need an assortment of bottle caps from either microbrews or smallbatch soda pop. Preferably selecting bottle caps with interesting designs. You will also need a hot glue gun, magnets that will fit inside the bottlecap, and something to use as a spacer such as a piece of Styrofoam, sliced wood dowel or piece of plastic.
 Place your bottle caps upside down on the work surface as shown in the photos below. Hot glue your spacer inside the bottlecap. Make sure your spacer sit evenly with the edge of the bottlecap in thickness. If you do not have a spacer fill the bottlecap with hot glue and let cool. The reason for letting the glue cool is that if you place the magnet on the hot glue while it is still hot the magnet will sink out of sight.
You will want the magnet to set above the edge of the bottlecap so if the bottlecap magnet gets moved it is less likely to scratch the refrigerator. If you're concerned about scratching the refrigerator apply a small bead of hot glue around the sharp edges. Another option is to buy a cookie sheet from the dollar store and use it to display your magnets on.

 Once the glue has cooled the magnet is finished and ready to use or give as a gift. It is also a great way to keep track of all the great beverages that you drink or just to collect bottle caps.
The following is a short video on how to make the magnets.

Thursday, November 5, 2015

DIY custom craft micro clamps

Do you need a micro clamp but don't want to spend the money? Here's a quick DIY micro clamp made from clothes pins.


Micro clamps can be made cheaply from a package of close pins purchased from the dollar store. As you can see they can be made in an assorted shapes and sizes to meet your custom needs.

 You can use a belt sander, disk sander, Dremel or whatever you happen to have. I have even used a scroll saw to cut various shapes and sizes. My preferred method is still to use a belt sander with a course grit but that is only because it is quick and easy.

These clamps can be made in a minute or less and not only do they come in handy for various projects, I have also found them to be in demand at craft and trade shows. I usually sell them as an assorted package of 4 for a dollar.
They can be used for various projects such as holding projects while I'm painting them, or holding parts together as they are being glued. Uses are many, and if you know a crafter in need of clamps, they make a great gift.


This is a short video of how I make my micro clamps from cloths pins.

Thursday, October 15, 2015

3D Pen holiday ornament ideas

Using a 3-D pen with a tennis ball used as a form

   One of the big disadvantages of a 3-D pen is the lack of precision. Unlike a 3-D printer the 3-D pen relies not on a computer but on how skilled you are with your hands. However you can compensate on some things by using a form rather than just creating freehand. Here I am using a tennis ball as a form to create a Christmas ornament, but realize that any ball that can withstand the heat from the pen can be used. And any size ball can be used to create even more than just ornaments, such as using a basketball to create a lampshade. You may wish to cover your ball with masking tape or some other material so the plastic does not melt into the ball. I'm using the tennis ball basically because that is what I have handy and the plastic adheres enough to the ball to make it easy to control. The disadvantage of using a tennis ball is all the small fibers that the plastic adheres to. This can make removing the finished ornament rather difficult. The trick I use to overcome this is the use of a old painter's palette knife. Using the knife as I work, I periodically carefully lift the plastic off of the tennis ball. A thin blade screwdriver could also be used in the same manner. Just be sure to lift the plastic as you work rather than trying to do it all at once at the end. If you try to wait until the end, it becomes extremely difficult to lift the plastic without breaking it.


    Once you have removed your ornament you then can began to remove the fine hairs with a lighter or hot knife. Be sure and move quickly so as not to melt the plastic ornament you're working on. Most of the ornaments that I create are shaped similar to a half finished death Star. If you wish to create a full sphere, you need to create two halves and then weld them together after you have removed them from the tennis ball form. One trick I use is to create the ornament using the lines on the tennis ball, rather than a straight half circle. This also helps hide any seem that is created when I weld the two halves together, as it is not a straight line.

     So here we have our finished ornament and all that is left to do is to add a bit of thread or ribbon to hang it by. We can also add lace, beads, crystals or other decorations to the ornament as well as sand and paint the ornament as needed. The type of artwork you use is up to you and I have personally created ornaments for all the seasons, not just Christmas. So have fun and enjoy creating a little bit of artwork with your 3-D pen.

Monday, March 23, 2015

Paintbrush cleaning and storage jar

Often we are throwing out and replacing paintbrushes that were left to sit in the bottom of a jar. This flares and ruins the brush and if left long enough dried out, brittle and useless. This can be expensive, time-consuming and just a plain waste.  But here is a jar that will keep your paintbrushes like new. It is a simple and easy DIY to make with found materials. And can be sold at arts and craft shows for several dollars.

 The jar stays sealed and suspends paintbrushes off the bottom of the jar. Liquids can be added to the jar for cleaning the brushes. The jar is airtight and thus maintains a plasticity of the bristles.

The lid consists of a mason jar ring, a mason jar lid with a hole cut in it and a piece of rubber cut from a tire innertube. Cut the innertube to the same size as the mason jar lid and place it on top of the mason jar lid when assembling. Punch several small holes in the rubber innertube, preferably with a leather punch. Make the diameter of the holes slightly smaller than the handle of the brushes being used. (This is to keep an airtight fit around the handle of the paintbrush and to help hold the brush in place when it is being suspended off the bottom of the jar. )It is important that you use some type of hole punch to keep the holes from splitting and allowing air in the jar.
I use a glass jar and metal lids because the paints and solvents I use would dissolve any other type of container. But if you're only using water-based paints then a plastic jar or cup could be used.


To add paintbrushes to the jar simply push the handle of the paint brush up through the bottom of the lid and through the holes in the rubber seal that you have made. Adjust the brush so that the brush is not sitting on the bottom of the jar and there you have it. The perfect paint brush cleaning and storage jar.