Showing posts with label craft ideas. Show all posts

Tuesday, July 12, 2016

Toolbox Giftbasket

Toolbox Giftbasket

for
Him or Her


    Enlarge this design to whatever size you need.The length can be adjusted to however long you need. I recommend recessing the dowel handle or even drilling a hole all the way through for the dowel. Then hold in place with screws and or glue. Make sure you use the appropriate length screws and glue for the bottom and sides. Sand the sides of the project so that you can stain the wood afterward, but painting or decorating the box would probably also work. 
    Once you're finished with the project all you have left to do is to fill it with your favorite goodies for your favorite person and you will have a gift they will not soon forget. I love this project because it is such a versatile gift that can be given to him or her. It leaves them with something to use after they have consumed the goodies inside and could be used as a toolbox or even a planter for the front porch.

Be sure to checkout our web site www.nevadacrafter.com and our other blogs http://craft44.blogspot.com/ and http://nevadacrafter.blogspot.com/

Saturday, March 19, 2016

Do you need washers for your craft projects?

Washers for whirligigs


FOR SAFETY REASONS NEVER USE THESE WASHERS TO REPLACE PARTS ON COMMERCIAL PRODUCTS. 

Always use the manufacturer's recommended replacement parts.


    Nylon washers are not very cheap, but I have found an alternative that cost next to nothing, helps the environment and works almost as well. 
    One of the things that I do on a yearly basis is to do preventative maintenance on my whirligigs and weathervane's. With all the moving parts and high winds, there is a lot of wear and tear on these mechanical wonders. What I found out is metal on wood wears out the most, so I use a lot of plastic or nylon washers. Although washers are not the most expensive part to a whirligig, they can cut into your profits.

  I couldn't help, but share this money-saving and environmentally friendly up_cycling of plastic jugs. As for the patterns, I simply invested in an assortment of metal washers to use as a template for the various size washers that I use in my whirligigs. After all for a couple of bucks worth of cheap metal washers, I now have a set of templates that are worth the investment and will never wear out. I could've very easily used a compass to draw the circles, but I wanted something that was more consistent with actual washers.

    
(Be sure to use the appropriate safety goggles and other safety equipment when using rotary tools)

    I have found almond milk jugs and other opaque or heavier jugs seem to make the better washers. Anyhow, using a metal washer as my template and a black marker to trace around the metal washer, I create my patterns. Usually, I take the time to make several hundred at a time, so I have washers on hand for later. Then I simply rough cut them using heavy-duty utility scissors, dollar store kitchen scissors or a Dremel with a fine tip rotary cutting blade. (An X-Acto knife on a cutting board will also work as well.) I then finish the washer by sanding the edges or dragging a knife blade crossways against the grain to remove any ragged edges. A Dremel with an abrasive bit also works very well.

For those of you who like to do things the hard way I have included the following photo as a pattern.
Now keep in mind these washers will not necessarily take the place of a heavy-duty nylon washer and will most likely biodegrade over time if exposed to sunlight.


 For other craft projects and ideas be sure and check out our other blogs and our website at www.nevadacrafter.com

Thursday, December 10, 2015

Quick and easy Bottlecap refrigerator magnets

Quick and easy Bottlecap refrigerator magnets 

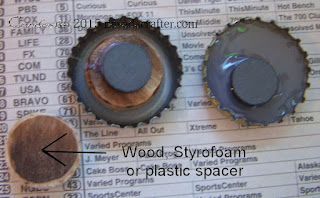
So for this project you will need an assortment of bottle caps from either microbrews or smallbatch soda pop. Preferably selecting bottle caps with interesting designs. You will also need a hot glue gun, magnets that will fit inside the bottlecap, and something to use as a spacer such as a piece of Styrofoam, sliced wood dowel or piece of plastic.
 Place your bottle caps upside down on the work surface as shown in the photos below. Hot glue your spacer inside the bottlecap. Make sure your spacer sit evenly with the edge of the bottlecap in thickness. If you do not have a spacer fill the bottlecap with hot glue and let cool. The reason for letting the glue cool is that if you place the magnet on the hot glue while it is still hot the magnet will sink out of sight.
You will want the magnet to set above the edge of the bottlecap so if the bottlecap magnet gets moved it is less likely to scratch the refrigerator. If you're concerned about scratching the refrigerator apply a small bead of hot glue around the sharp edges. Another option is to buy a cookie sheet from the dollar store and use it to display your magnets on.

 Once the glue has cooled the magnet is finished and ready to use or give as a gift. It is also a great way to keep track of all the great beverages that you drink or just to collect bottle caps.
The following is a short video on how to make the magnets.