Showing posts with label Recycling. Show all posts

Tuesday, July 12, 2016

Toolbox Giftbasket

Toolbox Giftbasket

for
Him or Her


    Enlarge this design to whatever size you need.The length can be adjusted to however long you need. I recommend recessing the dowel handle or even drilling a hole all the way through for the dowel. Then hold in place with screws and or glue. Make sure you use the appropriate length screws and glue for the bottom and sides. Sand the sides of the project so that you can stain the wood afterward, but painting or decorating the box would probably also work. 
    Once you're finished with the project all you have left to do is to fill it with your favorite goodies for your favorite person and you will have a gift they will not soon forget. I love this project because it is such a versatile gift that can be given to him or her. It leaves them with something to use after they have consumed the goodies inside and could be used as a toolbox or even a planter for the front porch.

Be sure to checkout our web site www.nevadacrafter.com and our other blogs http://craft44.blogspot.com/ and http://nevadacrafter.blogspot.com/

Thursday, December 10, 2015

Quick and easy Bottlecap refrigerator magnets

Quick and easy Bottlecap refrigerator magnets 

So for this project you will need an assortment of bottle caps from either microbrews or smallbatch soda pop. Preferably selecting bottle caps with interesting designs. You will also need a hot glue gun, magnets that will fit inside the bottlecap, and something to use as a spacer such as a piece of Styrofoam, sliced wood dowel or piece of plastic.
 Place your bottle caps upside down on the work surface as shown in the photos below. Hot glue your spacer inside the bottlecap. Make sure your spacer sit evenly with the edge of the bottlecap in thickness. If you do not have a spacer fill the bottlecap with hot glue and let cool. The reason for letting the glue cool is that if you place the magnet on the hot glue while it is still hot the magnet will sink out of sight.
You will want the magnet to set above the edge of the bottlecap so if the bottlecap magnet gets moved it is less likely to scratch the refrigerator. If you're concerned about scratching the refrigerator apply a small bead of hot glue around the sharp edges. Another option is to buy a cookie sheet from the dollar store and use it to display your magnets on.

 Once the glue has cooled the magnet is finished and ready to use or give as a gift. It is also a great way to keep track of all the great beverages that you drink or just to collect bottle caps.
The following is a short video on how to make the magnets.

Tuesday, July 3, 2012

Candle stick, whats it good for?

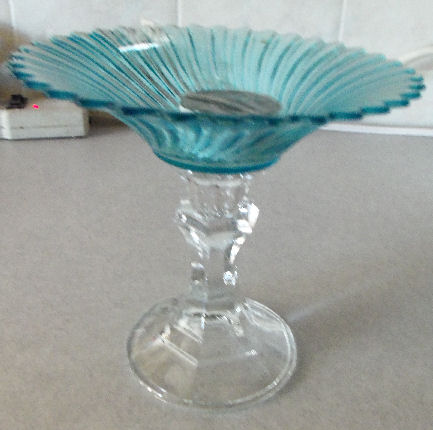
    Often, how we perceive something determines whether it is useful or could be made useful. Take the image below of a couple of plates and the candlestick holder.


    Most people would look at it and think two plates and candlestick, what of it?  But my grandfather used to play a game of what if. The game was rather simple put two or more items together and what do you come up with? A cat and a refrigerator, what do you get? A cat that has a light come on when it opens its mouth. The person with the most unusual combination, wins.  Usually it was just to see if he could get me to laugh. But there would always be some combination that would surprise the both of us and always made us think,"could that actually work?"


    So if you were to use clear epoxy and glue the motive candle dish to the candlestick , what would you have? A candy dish or soap dish?


How about we glue the clear plate to the candlestick , what would we have then? A fancy serving dish or a raised plate to display something on?


How about a bowl and a candlestick ,what would you have then?  A fancy ice cream dish or a goblet for your kids play ? So the next time you're in a dollar store, just remember, a candlestick is not always a candlestick .  And on another note my grandfather always said; " Survival is not always a matter of what you have , but what you can make with what you have.
(NOTE: I always try to use a candle stick with a broad base or glue a flat plate on the bottom to make a broad base. This will help keep your dish from falling over . Also, I have found that clear epoxy works best, not supper glue.)

Saturday, June 30, 2012

Homemade aluminum plant tags


Homemade aluminum plant tags


So you may have wondered why I didn't use aluminum cans?


Aluminum cans are hard to work with and leave sharp edges. That's not to say you can't use them, just be more careful. If you use an aluminum can be sure to bend the edges over to eliminate sharp edges. (note: If you can get cut on a piece of paper, you can get cut on one of these tags.) Sorry in this day and age with all the idiots out there, I have to put disclaimers on everything.
The aluminum I use is easy to work with and it's an aluminum that doesn't normally get recycled. It is not as rigid as aluminum cans, but still holds it's shape.
The plant tags will last for a long time. I have some tags that are over 10 years old. The following is an example of what I put on my tags.

  • Name of plant
  • date planted (moon phases and or planetary alignment )
  • where purchased (note many stores guarantee plants)
  • original location (if moved or propagated)
  • herb, fruit,vegetable
Or

  • Name of plant
  • Ref number
Then have a catalog with the reference number and all the details about the plant that you could not include on the tag.

Other ideas are to use the tags on gifts, as Christmas ornaments, luggage tags, or anywhere you need a nice tag.

Sunday, June 24, 2012

Make your own stepping stone mold

Stepping stones

Make your own stepping stone mold.
Note: things not mention in video.
  1. 1.Stones take up to 5 or 6 days to fully cure and be strong enough to walk on.
  2. 2. When setting stones in place it is very important to set them on smooth level ground. any uneven points or rocks under the stone could break or crack the stone.

Thursday, May 31, 2012

stinky sponges

Fix smelly sponges with hand sanitizer.


The next time your washing dishes and you notice your sponge smells bad. Instead of throwing the sponge out try a little hand sanitizer. Put two or three squirts on the sponge and work it into the sponge. Let it set for a day and the smell should be gone.

Saturday, May 26, 2012

Coffee grounds

Coffee grounds


So let's talk coffee grounds.

For years I have used coffee grounds to acidif the soil around my plants. I would sprinkle my coffee grounds around my roses , tomatoes and evergreens. But I didn't know you could use coffee grounds to keep pests away from your plants. I was having problems with worms in my cabbages. A friend suggested that sprinkling some coffee grounds on and around my cabbage would deter the cabbage worms . To my surprise it worked and have used it ever since .


The paper towel is to help dry the coffee. It is easyer to sprinkle if the coffee ground are dry and I can reuse the paper towel or put it in compost.

Thursday, January 12, 2012

Reusing aluminum cans to build concrete walls.


Reusing aluminum cans to build concrete walls.
        Using aluminum cans and bottles for constructing walls is not a new idea. Many ghost towns around Nevada show prime examples of construction with bottles. People had to get creative and use whatever there was plenty of. On more than one occasion I have come across ghost towns where bottles were used in construction of buildings. In some cases the walls were constructed using adobe clay and bottles. The type of material used to construct buildings were dictated by the cost and availability of materials. As the local dump usually had a surplus of whiskey bottles this was the primary item used but by no means was it the only item used. Anything and everything was fair game for reusing and in some cases entire towns were moved from one mining site to another, wasting nothing.

My parents and grandparents were always recycling everything, nothing was ever thrown out or wasted . We reused soup cans, coffee cans and anything else that might have been thrown away. My dads mantra was " waste not want not." and "throw it away only if you can't recycle it." Recycling old mailboxes into garden toolboxes to reusing old garden hose for tool handles .

Don't recycle!

Don't recycle!

This blog is about reusing items that we would normally throw away or recycle. This is not a new idea but it is an idea that corporate America hopes will never catch on.