Simple craft ideas or find out how to just simply save money. Learn how to reuse instead of recycle and save money for the really important things. Never waste anything.
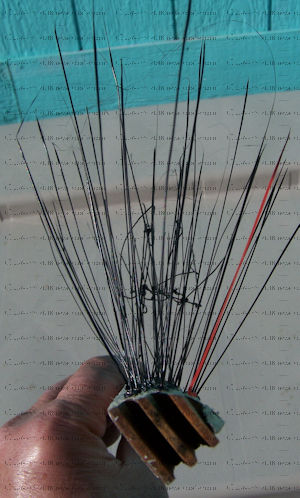
In my first attempts at creating bird spikes, I simply used a quarter round or half round piece of old molding. Using a 16th inch drill bit I drilled numerous holes and then used the 3-D pen to partly fill the hole with extrusion from the pen and then moving outward creating spikes.
Although the finished product did not give me the rigidity in the spikes that I wanted it still seemed to work.
In my last attempt I ran a bead of plastic at the bottom. This created better adhesion and stability to the spikes. I also tried creating lattice to give it additional rigidity, although I'm not sure that it was needed.
The spikes do not harm the bird as they are not sharp enough or stiff enough to do so. They end up being more like the bristles on a soft broom and more of an obstacle that the bird can't quite figure out how to get around.
A piece of styrofoam could be used in place of the wood, making it light enough to be stuck to a wall with poster putty. This might work great with woodpeckers and flickers that tend to roost on the sidewalls or under eaves . Note: The Styrofoam will melt some with the 3D pen, so use gloves and some caution when working with it.
I look forword to hearing any constructive ideas or suggestions. Be sure and check out our other posts, blogs and our website www.nevadacrafter.com
FOR SAFETY REASONS NEVER USE THESE WASHERS TO REPLACE PARTS ON COMMERCIAL PRODUCTS.
Always use the manufacturer's recommended replacement parts.
Nylon washers are not very cheap, but I have found an alternative that cost next to nothing, helps the environment and works almost as well.
One of the things that I do on a yearly basis is to do preventative maintenance on my whirligigs and weathervane's. With all the moving parts and high winds, there is a lot of wear and tear on these mechanical wonders. What I found out is metal on wood wears out the most, so I use a lot of plastic or nylon washers. Although washers are not the most expensive part to a whirligig, they can cut into your profits.
I couldn't help, but share this money-saving and environmentally friendly up_cycling of plastic jugs. As for the patterns, I simply invested in an assortment of metal washers to use as a template for the various size washers that I use in my whirligigs. After all for a couple of bucks worth of cheap metal washers, I now have a set of templates that are worth the investment and will never wear out. I could've very easily used a compass to draw the circles, but I wanted something that was more consistent with actual washers.
(Be sure to use the appropriate safety goggles and other safety equipment when using rotary tools)
I have found almond milk jugs and other opaque or heavier jugs seem to make the better washers. Anyhow, using a metal washer as my template and a black marker to trace around the metal washer, I create my patterns. Usually, I take the time to make several hundred at a time, so I have washers on hand for later. Then I simply rough cut them using heavy-duty utility scissors, dollar store kitchen scissors or a Dremel with a fine tip rotary cutting blade. (An X-Acto knife on a cutting board will also work as well.) I then finish the washer by sanding the edges or dragging a knife blade crossways against the grain to remove any ragged edges. A Dremel with an abrasive bit also works very well.
For those of you who like to do things the hard way I have included the following photo as a pattern.
Now keep in mind these washers will not necessarily take the place of a heavy-duty nylon washer and will most likely biodegrade over time if exposed to sunlight.
For other craft projects and ideas be sure and check out our other blogs and our website at www.nevadacrafter.com
First we start with a soda bottle.The one in the photo is a 1 L bottle but a 2 L bottle will also work.
Cut the top off has shown.
Invert the top and shown.
At this point you can glue or tape the inverted top in place. You can also add a couple holes at the top edge for a wire or string hanger,as in the following photo.
The bait I use depends on the type of insect that I wish to trap.
houseflies: one egg in 1 cup water blended. (If you use a 2 L bottle you may wish to use 2 cups of water instead of one.) This bait will work immediately and does not need to sit and ferment for it to work.
wasp or hornets: use 1 to 2 cups of Coke soda (not diet)
IMPORTANT NOTE:
Place trap away from your house, as after a few days it is going to smell real bad. This will also draw the insects away from your home. Egg wash bait will also attract animals, so be sure to place trap out of reach of dogs, cats, skunks and other animals.
When all of your insects have drowned in the trap and it is full, simply throw away entire trap.
[note: The glass used in this project is not safety glass and can break under certain conditions. If rocks or other objects strike the glass with sufficient force it is possible for the glass to break creating sharp edges and unsafe conditions. The author of this blog is not responsible for misuse or persons not taking do care and it's information is intended for conceptual purposes only.]
To make your mold cut off the bottom of a 5 gallon plastic bucket. (note: do not throw away the upper half as it can be used to be used to protect plants and other things, but that is for another blog.) Using a ruler or tri-square cut 3 inches off the bottom of the bucket. This should give you a mold that is 2 1/2 inches to 3 inches deep. Steppingstones need to be at least 2 inches thick in order to support your weight. Be sure and spray a mold release such as vegetable oil on the inside of your mold.(note; do not spray the glass jar as you want the cement stick to the jar. you may even want to sand the outside edges to make the cement stick better, but do not sand the bottom.) Be sure and select jars that are wide-mouth and large enough and deep enough to fit your solar light inside of before you pour the cement.
Once your cement is poured be sure and tap the edges to remove air bubbles. Wipe any cement sticking to the edges of the lid, as you'll want to remove the lid later. Let your cement set overnight to cure and your stones should be easily removed from the mold. Be sure and take care as the cement will not be completely cured as yet and the stones are still fragile. If it does not easily remove from the mold, then allow the cement to cure a little longer. Set in a tub of water or keep damp inside a plastic bag for at least 5 to 6 days to finish curing. The slower cement cures, the stronger the cement.
I used these glass ball solar lights. The LED is mounted on top of the solar cell, which makes them perfect for this project. using gloves, safety glasses and a screwdriver I carefully pry off the glass ball. Work the screwdriver down the edges loosening any glue and then twisting the screwdriver to pry the glass ball loose. Discard or save for another project the glass ball and tube stand.
Remove your lid from the glass jar. Using a Styrofoam ball I cut off the bottom of the ball to create a flat surface and cut a hole in the center of the ball to mount the solar light in. (Any piece of Styrofoam will work as long as it holds the solar light up right.) I used a low temp hot glue gun as I wanted to be able to remove the solar light if I needed to make repairs. I glue the flat bottom to the inside of the jar lid and tack the solar light to the Styrofoam ball to hold it in place while it is being assembled.
Once you have your stone assembled, you are ready to set the stone in the ground. Select a site that is free of rocks and other debris. Rocks and other debris could score the glass causing it to break or cause uneven pressure on the stone itself and break the steppingstone. Digg a depression large enough for the stone itself (about a 1/2 inch deep) and a small depression slightly smaller than the diameter of the jar and slightly deeper than the depth of your jar in the center to accommodate the glass jar. Be sure and do not set the stone too deep as you do not want the stone to become buried. Move the stone around slightly and tamp the soil firmly making sure the stone is set firmly and does not rock back and forth. Uneven pressure on the stone could cause it to break, so it is very important that the stone is set firmly before you put your full weight on the stone.
So there you have it, solar lighted steppingstones to light your path or just add accent to your garden or landscaping.
***********************
If solar lights are not your thing or you just want to add color to your stones then a low voltage system may be what you want. The diagram below shows how you might use wine bottles cut in half to make your lighted stepping stones.
You could also use a light set like this and clear bottles to get colored lights. ( note: make sure lights are rated for being buried or exposed to moisture )
Adding marbles or tile or other colorful items is simple. Just lay them in the bottom of the mold and pour cement carefully on top. Keys, tile, marbles and even broken dishes can be used in a mosaic pattern. After it semi_sets use a toothbrush or nylon pot scrubber to clear off cement and reveal mosaic.If I was to use marble or other items again I would try to keep them away from the edges. I did not do so in the one shown above and I got too close to the edges which created weak spots and ruff edges. After it has fully cured I will coat with a clear seal, which will give it a polished look.
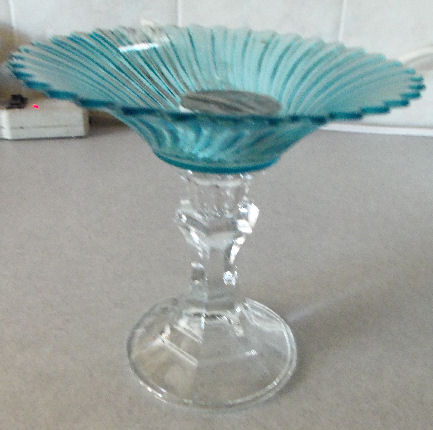
Often, how we perceive something determines whether it is useful or could be made useful. Take the image below of a couple of plates and the candlestick holder.
Most people would look at it and think two plates and candlestick, what of it? But my grandfather used to play a game of what if. The game was rather simple put two or more items together and what do you come up with? A cat and a refrigerator, what do you get? A cat that has a light come on when it opens its mouth. The person with the most unusual combination, wins. Usually it was just to see if he could get me to laugh. But there would always be some combination that would surprise the both of us and always made us think,"could that actually work?"
So if you were to use clear epoxy and glue the motive candle dish to the candlestick , what would you have? A candy dish or soap dish?
How about we glue the clear plate to the candlestick , what would we have then? A fancy serving dish or a raised plate to display something on?
How about a bowl and a candlestick ,what would you have then? A fancy ice cream dish or a goblet for your kids play ? So the next time you're in a dollar store, just remember, a candlestick is not always a candlestick . And on another note my grandfather always said; " Survival is not always a matter of what you have , but what you can make with what you have.
(NOTE: I always try to use a candle stick with a broad base or glue a flat plate on the bottom to make a broad base. This will help keep your dish from falling over . Also, I have found that clear epoxy works best, not supper glue.)
So you may have wondered why I didn't use aluminum cans?
Aluminum cans are hard to work with and leave sharp edges. That's not to say you can't use them, just be more careful. If you use an aluminum can be sure to bend the edges over to eliminate sharp edges. (note: If you can get cut on a piece of paper, you can get cut on one of these tags.)Sorry in this day and age with all the idiots out there, I have to put disclaimers on everything.
The aluminum I use is easy to work with and it's an aluminum that doesn't normally get recycled. It is not as rigid as aluminum cans, but still holds it's shape. The plant tags will last for a long time. I have some tags that are over 10 years old. The following is an example of what I put on my tags.
Name of plant
date planted (moon phases and or planetary alignment )
where purchased (note many stores guarantee plants)
original location (if moved or propagated)
herb, fruit,vegetable
Or
Name of plant
Ref number
Then have a catalog with the reference number and all the details about the plant that you could not include on the tag.
Other ideas are to use the tags on gifts, as Christmas ornaments, luggage tags, or anywhere you need a nice tag.
Make your own stepping stone mold. Note: things not mention in video.
1.Stones take up to 5 or 6 days to fully cure and be strong enough to walk on.
2. When setting stones in place it is very important to set them on smooth level ground. any uneven points or rocks under the stone could break or crack the stone.
For years I have used coffee grounds to
acidif the soil around my plants. I would sprinkle my coffee grounds around my
roses , tomatoes and evergreens. But I didn't know you could use coffee grounds
to keep pests away from your plants. I was having problems with worms in my
cabbages. A friend suggested that sprinkling some coffee grounds on and around
my cabbage would deter the cabbage worms . To my surprise it worked and have
used it ever since .
The paper towel is to help dry the coffee. It is easyer to sprinkle if the coffee ground are dry and I can reuse the paper towel or put it in compost.
Save money by making your own foaming liquid soap from regular liquid soap. This is a secret that the liquid soap manufacturers do not want you to know.