Showing posts with label Arts. Show all posts

Thursday, June 23, 2016

Nevada crafter contest winner for the month of May 2016

Congratulations to Lisa Hess for being the month of May Nevada crafter contest winner.

Be sure and check our website and blogs for future contests and contest rules.
www.nevadacrafter.com

http://craft44.blogspot.com/

http://nevadacrafter.blogspot.com/

Wednesday, February 3, 2016

DIY Drawing Compass

DIY Drawing Compass

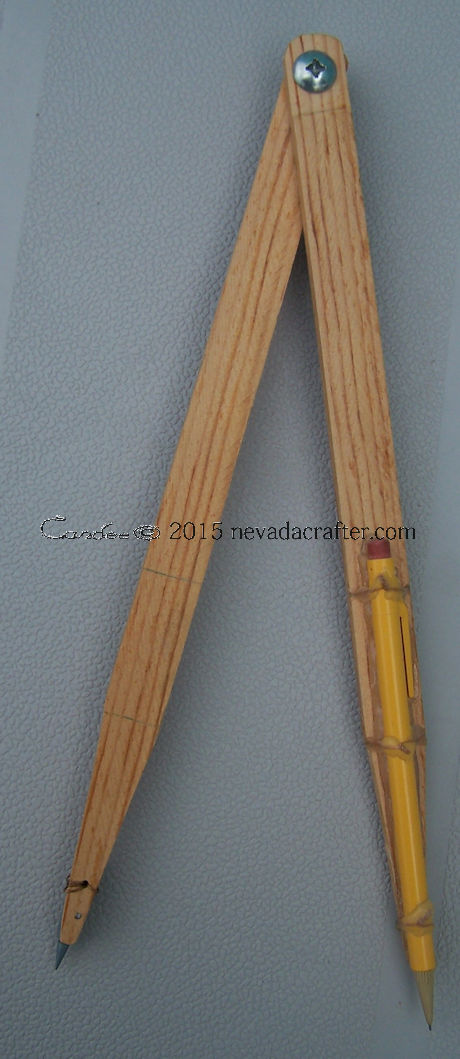
A drawing compass can come in handy, but most are the size kids use in school. I quickly found out that here locally, there were no large compasses to be had. Not only do they come in handy for my own art work, but there is some demand for the compasses them selves. So I present the following approximate pattern and photos of the one I made. 


(Please note: pattern may not be exact or to scale and some adjustments may need to be made. The pattern is presented as an approximate to the original and is intended as more of a guide. It should also be noted that the pattern may need adjusting depending on materials used and thickness of wood or other materials used.)

Note: 1/4 " wood was used

I used glue to hold and position the mechanical pencil and metal point. I then used wire to hold them in place while the glue set and left them in place to add strength. Any point can be used for the fulcrum, such as a nail, push pin, ect. 
Of course when I am making them for sale, I take care to use much nicer material, such as brass nails, ect. The size circle you can draw depends on how long or how many joints. A second screw and wing nut in the middle of the fulcrum, but I find it just as easy to just make the compass bigger. 
    I hope this idea is of help to the crafters and artists out there that need to make big circles and great art. Thank you for taking the time to read my blog and please check out our other blogs and subscribe. Please feel free to make constructive comments or suggestions.

Wednesday, January 13, 2016

Making money with your photo's, designs and slogans on the Internet.

In this day and age finding a legitimate and ethical way to make money online is sometimes near impossible. But there are a few companies that actually look out for your best interest. One such company is the following.
View more gifts at Zazzle.

Browse other gifts from Zazzle.
I have been working with Zazzle.com for over eight years and although I have not gotten rich doing so, I have gotten fair and ethical treatment. As to how much I make it varies and as the old saying goes"you get out of it what you put into it."
    First Zazzle is one of the few companies that allows you to keep your copyrights. In other words what you create you keep. It should also be understood that artisans should never give up all their rights and should never give up those rights indefinitely. Zazzle is allowed to use my artwork so long as I have it on the website and on their products for sale. I can remove any of my products at any time and the copyrights revert back to me. At the same time I agree only to use products that I own the copyrights to and agree that I will not publish my designs or artwork elsewhere and that Zazzle retains exclusive rights . So it is a good idea to periodically read thoroughly any and all agreements with whatever company you are doing business with. The contract is there not only to protect the company but also to protect you.
    Zazzle does a fair job of protecting your artwork from plagiarist and will give you friendly reminders when you accidentally create something too close to someone else's design. But always keep in mind that no one is perfect and Zazzle has its hands full just managing their own website.
    Zazzle will also help you promote your products with designer ads and other promotional tools. This is where having a blog or website is helpful as you will need to be able to advertise and promote your artwork. The Zazzle blog is very helpful with giving ideas suggestions on how to promote your work.
     It should also be noted that there are a couple of other ways to make money with Zazzle even if you're not an artisan. It should be noted that once you sign up, you can help promote and sell other people's work and receive a commission for that promotion. What is really cool is that you can help sell brand-name products such as the following.
Browse other gifts from Zazzle.

View more gifts at Zazzle. Selling and promoting products such as DC comics, Disney, Marvel, and far too many to mention here. It is easy and fun once you get the hang of it, so spend some time on the Zazzle website, see if there isn't some niche you can fill and make money from.
Just be sure and read all the fine print and make sure your following all the rules. It is a great way to create a passive income that can help pay the bills.

Tuesday, November 3, 2015

Suitcase into storage craft box

  Setting up at a craft show can be a pain, carrying boxes and totes can be cumbersome and sometimes hard to manage. And then there are times we just simply want a convenient place to carry our crafts when we are on the go. Or maybe we want a special place to put children's activities when they come to visit.
    One of my favorite haunts are yard sales and flea markets. I am constantly finding items to be upcycled, or restored into something new and wondrous. On one such trip I came across a couple of vintage suitcases that were in very poor condition. Although I may have restored them to their original condition I had something less expensive and much better in mind. Going to a craft show with a couple of suitcases seemed much easier than carrying several totes.

I started by painting the outside of the suitcase with a quality exterior house paint. This would help hide any blemishes and give a good protective coating to the outside of the suitcase. Once I had a good protective coating on the outside, I began decorating. First by using one of my favorite stencils to stencil a favorite slogan on the top of the suitcase. This personalize the suitcase and gave it more character. Later I would paint the brass fittings with a nice nail polish to protect them and to make them stand out.
    The inside of the suitcase was in pretty bad shape, with the original felt extremely well-worn and in some places holes. The only option here was to replace it with new felt, which I got at the local fabric store. Using a spray adhesive I cut and placed new felt over the top of the old felt. Once the new felt was in place I tack down the edges with hot glue. I hid this seems by brushing the edges of the seams with a stiff toothbrush.


     I continue to add embellishments from time to time, such as these butterfly stickers. Decorating the suitcases is a matter of using your imagination. One could use a theme such as Alice in Wonderland or use a vintage theme such as travel stickers or decoupage old newsprint or even sheet music. The uses for these suitcases are many, such as costumes and activities for kids or just plain storage for your arts and crafts projects and tools. The possibilities are limitless and should you ever become bored with what you have created it is simply a matter of putting on a new coat of paint and changing the style.


Thursday, October 15, 2015

3D Pen holiday ornament ideas

Using a 3-D pen with a tennis ball used as a form

   One of the big disadvantages of a 3-D pen is the lack of precision. Unlike a 3-D printer the 3-D pen relies not on a computer but on how skilled you are with your hands. However you can compensate on some things by using a form rather than just creating freehand. Here I am using a tennis ball as a form to create a Christmas ornament, but realize that any ball that can withstand the heat from the pen can be used. And any size ball can be used to create even more than just ornaments, such as using a basketball to create a lampshade. You may wish to cover your ball with masking tape or some other material so the plastic does not melt into the ball. I'm using the tennis ball basically because that is what I have handy and the plastic adheres enough to the ball to make it easy to control. The disadvantage of using a tennis ball is all the small fibers that the plastic adheres to. This can make removing the finished ornament rather difficult. The trick I use to overcome this is the use of a old painter's palette knife. Using the knife as I work, I periodically carefully lift the plastic off of the tennis ball. A thin blade screwdriver could also be used in the same manner. Just be sure to lift the plastic as you work rather than trying to do it all at once at the end. If you try to wait until the end, it becomes extremely difficult to lift the plastic without breaking it.


    Once you have removed your ornament you then can began to remove the fine hairs with a lighter or hot knife. Be sure and move quickly so as not to melt the plastic ornament you're working on. Most of the ornaments that I create are shaped similar to a half finished death Star. If you wish to create a full sphere, you need to create two halves and then weld them together after you have removed them from the tennis ball form. One trick I use is to create the ornament using the lines on the tennis ball, rather than a straight half circle. This also helps hide any seem that is created when I weld the two halves together, as it is not a straight line.

     So here we have our finished ornament and all that is left to do is to add a bit of thread or ribbon to hang it by. We can also add lace, beads, crystals or other decorations to the ornament as well as sand and paint the ornament as needed. The type of artwork you use is up to you and I have personally created ornaments for all the seasons, not just Christmas. So have fun and enjoy creating a little bit of artwork with your 3-D pen.

Ideas for 3D Pen Costume Projects

3D pen Halloween or Mardi Gras mask

    As I have said before the only real disadvantage of the 3-D pen is its precision, but it makes up for that in its versatility and scalability. Take for instance creating costumes or costume accessories. The pen is not limited by a print table size. I can create a mask or wardrobe accessory of any size. To offset its accuracy I use a form such as a cardboard mask in the photograph below.

The mask can be found in just about any craft or costume store. It is designed as a blank mask to be decorated but I have found that it works much better as a form. It is not plastic but pressed paper or cardboard which makes it perfect because it is heat resistant. The extruded plastic will stick to the paper which helps your work from moving around uncontrollably. The plastic mask I have found are usually far too thin and would melt. 
   
Using various artisan hash designs like those that you would use in sketching or drawings work very well for the 3-D pen. Here I have used circles for the bottom half and ?'s for the upper half. You may want to practice or try out different designs on paper with a pencil first. Practice making the same shapes until you are consistent with the size and shape you want. Keep in mind that the 3D pens work very similar to a welder on a micro scale. Practice using the pen forward and backwards or a back-and-forth motion when you are extruding filament. Using the pen in different directions will give you different thicknesses in the plastic that is extruded. Also keep in mind that as you are working, you need to periodically lift the mask off of its form using a artisan palette knife,Stainless Steel Painting Knife Spatula or thin flat blade screwdriver. The plastic will have a tendency to stick to the mask which is a good thing as it will keep your work in place, but if you wait until you are completed, your project will be extremely difficult to remove from the mask without breaking it. And if you should break any part of the mask just remember that can weld it back together with the 3-D pen. Be sure and save your blank form for repairs or modifications should you need to make changes at a later date.

3D pen Halloween or Mardi Gras mask

    As I have said before the only real disadvantage of the 3-D pen is its precision, but it makes up for that in its versatility and scalability. Take for instance creating costumes or costume accessories. The pen is not limited by a print table size. I can create a mask or wardrobe accessory of any size. To offset its accuracy I use a form such as a cardboard mask in the photograph below.

The mask can be found in just about any craft or costume store. It is designed as a blank mask to be decorated but I have found that it works much better as a form. It is not plastic but pressed paper or cardboard which makes it perfect because it is heat resistant. The extruded plastic will stick to the paper which helps your work from moving around uncontrollably. The plastic mask I have found are usually far too thin and would melt. 
   
Using various artisan hash designs like those that you would use in sketching or drawings work very well for the 3-D pen. Here I have used circles for the bottom half and ?'s for the upper half. You may want to practice or try out different designs on paper with a pencil first. Practice making the same shapes until you are consistent with the size and shape you want. Keep in mind that the 3D pens work very similar to a welder on a micro scale. Practice using the pen forward and backwards or a back-and-forth motion when you are extruding filament. Using the pen in different directions will give you different thicknesses in the plastic that is extruded. Also keep in mind that as you are working, you need to periodically lift the mask off of its form using a artisan palette knife, painting knife spatula or thin flat blade screwdriver. The plastic will have a tendency to stick to the mask which is a good thing as it will keep your work in place, but if you wait until you are completed, your project will be extremely difficult to remove from the mask without breaking it. And if you should break any part of the mask just remember that can weld it back together with the 3-D pen. Be sure and save your blank form for repairs or modifications should you need to make changes at a later date.
    Once you have completed your mask you can now sand and paint it a different color or add any embellishments, such as beads jewels etc. I use embroidery floss or ribbon to hold the mask on, as this gives it a Victorian style or feel. This looks more professional and will fetch a higher price if it doesn't look like a kids toy with an elastic band.
It should be noted that these masks can be modified and updated at a later time. Being able to change or modify what you create is one of the things that appeals me, not to mention being able to make repairs to anything that is damaged. What this amounts to is a costume design that will not only last a long time but a design that you will never get bored with.
Modified and updated mask with added eyelashes and flower.
    Once you have completed your mask you can now sand and paint it a different color or add any embellishments, such as beads jewels etc. I use embroidery floss or ribbon to hold the mask on, as this gives it a Victorian style or feel. This looks more professional and will fetch a higher price if it doesn't look like a kids toy with an elastic band.

Monday, March 23, 2015

Paintbrush cleaning and storage jar

Often we are throwing out and replacing paintbrushes that were left to sit in the bottom of a jar. This flares and ruins the brush and if left long enough dried out, brittle and useless. This can be expensive, time-consuming and just a plain waste.  But here is a jar that will keep your paintbrushes like new. It is a simple and easy DIY to make with found materials. And can be sold at arts and craft shows for several dollars.

 The jar stays sealed and suspends paintbrushes off the bottom of the jar. Liquids can be added to the jar for cleaning the brushes. The jar is airtight and thus maintains a plasticity of the bristles.

The lid consists of a mason jar ring, a mason jar lid with a hole cut in it and a piece of rubber cut from a tire innertube. Cut the innertube to the same size as the mason jar lid and place it on top of the mason jar lid when assembling. Punch several small holes in the rubber innertube, preferably with a leather punch. Make the diameter of the holes slightly smaller than the handle of the brushes being used. (This is to keep an airtight fit around the handle of the paintbrush and to help hold the brush in place when it is being suspended off the bottom of the jar. )It is important that you use some type of hole punch to keep the holes from splitting and allowing air in the jar.
I use a glass jar and metal lids because the paints and solvents I use would dissolve any other type of container. But if you're only using water-based paints then a plastic jar or cup could be used.


To add paintbrushes to the jar simply push the handle of the paint brush up through the bottom of the lid and through the holes in the rubber seal that you have made. Adjust the brush so that the brush is not sitting on the bottom of the jar and there you have it. The perfect paint brush cleaning and storage jar.