Thursday, October 15, 2015

Ideas for 3D Pen Costume Projects

3D pen Halloween or Mardi Gras mask

    As I have said before the only real disadvantage of the 3-D pen is its precision, but it makes up for that in its versatility and scalability. Take for instance creating costumes or costume accessories. The pen is not limited by a print table size. I can create a mask or wardrobe accessory of any size. To offset its accuracy I use a form such as a cardboard mask in the photograph below.

The mask can be found in just about any craft or costume store. It is designed as a blank mask to be decorated but I have found that it works much better as a form. It is not plastic but pressed paper or cardboard which makes it perfect because it is heat resistant. The extruded plastic will stick to the paper which helps your work from moving around uncontrollably. The plastic mask I have found are usually far too thin and would melt. 
   
Using various artisan hash designs like those that you would use in sketching or drawings work very well for the 3-D pen. Here I have used circles for the bottom half and ?'s for the upper half. You may want to practice or try out different designs on paper with a pencil first. Practice making the same shapes until you are consistent with the size and shape you want. Keep in mind that the 3D pens work very similar to a welder on a micro scale. Practice using the pen forward and backwards or a back-and-forth motion when you are extruding filament. Using the pen in different directions will give you different thicknesses in the plastic that is extruded. Also keep in mind that as you are working, you need to periodically lift the mask off of its form using a artisan palette knife,Stainless Steel Painting Knife Spatula or thin flat blade screwdriver. The plastic will have a tendency to stick to the mask which is a good thing as it will keep your work in place, but if you wait until you are completed, your project will be extremely difficult to remove from the mask without breaking it. And if you should break any part of the mask just remember that can weld it back together with the 3-D pen. Be sure and save your blank form for repairs or modifications should you need to make changes at a later date.

3D pen Halloween or Mardi Gras mask

    As I have said before the only real disadvantage of the 3-D pen is its precision, but it makes up for that in its versatility and scalability. Take for instance creating costumes or costume accessories. The pen is not limited by a print table size. I can create a mask or wardrobe accessory of any size. To offset its accuracy I use a form such as a cardboard mask in the photograph below.

The mask can be found in just about any craft or costume store. It is designed as a blank mask to be decorated but I have found that it works much better as a form. It is not plastic but pressed paper or cardboard which makes it perfect because it is heat resistant. The extruded plastic will stick to the paper which helps your work from moving around uncontrollably. The plastic mask I have found are usually far too thin and would melt. 
   
Using various artisan hash designs like those that you would use in sketching or drawings work very well for the 3-D pen. Here I have used circles for the bottom half and ?'s for the upper half. You may want to practice or try out different designs on paper with a pencil first. Practice making the same shapes until you are consistent with the size and shape you want. Keep in mind that the 3D pens work very similar to a welder on a micro scale. Practice using the pen forward and backwards or a back-and-forth motion when you are extruding filament. Using the pen in different directions will give you different thicknesses in the plastic that is extruded. Also keep in mind that as you are working, you need to periodically lift the mask off of its form using a artisan palette knife, painting knife spatula or thin flat blade screwdriver. The plastic will have a tendency to stick to the mask which is a good thing as it will keep your work in place, but if you wait until you are completed, your project will be extremely difficult to remove from the mask without breaking it. And if you should break any part of the mask just remember that can weld it back together with the 3-D pen. Be sure and save your blank form for repairs or modifications should you need to make changes at a later date.
    Once you have completed your mask you can now sand and paint it a different color or add any embellishments, such as beads jewels etc. I use embroidery floss or ribbon to hold the mask on, as this gives it a Victorian style or feel. This looks more professional and will fetch a higher price if it doesn't look like a kids toy with an elastic band.
It should be noted that these masks can be modified and updated at a later time. Being able to change or modify what you create is one of the things that appeals me, not to mention being able to make repairs to anything that is damaged. What this amounts to is a costume design that will not only last a long time but a design that you will never get bored with.
Modified and updated mask with added eyelashes and flower.
    Once you have completed your mask you can now sand and paint it a different color or add any embellishments, such as beads jewels etc. I use embroidery floss or ribbon to hold the mask on, as this gives it a Victorian style or feel. This looks more professional and will fetch a higher price if it doesn't look like a kids toy with an elastic band.

Monday, March 23, 2015

Paintbrush cleaning and storage jar

Often we are throwing out and replacing paintbrushes that were left to sit in the bottom of a jar. This flares and ruins the brush and if left long enough dried out, brittle and useless. This can be expensive, time-consuming and just a plain waste.  But here is a jar that will keep your paintbrushes like new. It is a simple and easy DIY to make with found materials. And can be sold at arts and craft shows for several dollars.

 The jar stays sealed and suspends paintbrushes off the bottom of the jar. Liquids can be added to the jar for cleaning the brushes. The jar is airtight and thus maintains a plasticity of the bristles.

The lid consists of a mason jar ring, a mason jar lid with a hole cut in it and a piece of rubber cut from a tire innertube. Cut the innertube to the same size as the mason jar lid and place it on top of the mason jar lid when assembling. Punch several small holes in the rubber innertube, preferably with a leather punch. Make the diameter of the holes slightly smaller than the handle of the brushes being used. (This is to keep an airtight fit around the handle of the paintbrush and to help hold the brush in place when it is being suspended off the bottom of the jar. )It is important that you use some type of hole punch to keep the holes from splitting and allowing air in the jar.
I use a glass jar and metal lids because the paints and solvents I use would dissolve any other type of container. But if you're only using water-based paints then a plastic jar or cup could be used.


To add paintbrushes to the jar simply push the handle of the paint brush up through the bottom of the lid and through the holes in the rubber seal that you have made. Adjust the brush so that the brush is not sitting on the bottom of the jar and there you have it. The perfect paint brush cleaning and storage jar.

Monday, October 7, 2013

Cheap DIY Fly or wasp trap and bait

Homemade insect trap
fly, wasp or hornet.


First we start with a soda bottle.The one in the photo is a 1 L bottle but a 2 L bottle will also work. 
Cut the top off has shown.
Invert the top and shown.
At this point you can glue or tape the inverted top in place. You can also add a couple holes at the top edge for a wire or string hanger,as in the following photo.
The bait I use depends on the type of insect that I wish to trap.

houseflies: one egg in 1 cup water blended. (If you use a 2 L bottle you may wish to use 2 cups of water instead of one.) This bait will work immediately and does not need to sit and ferment for it to work. 

wasp or hornets: use 1 to 2 cups of Coke soda (not diet) 

IMPORTANT NOTE:
Place trap away from your house, as after a few days it is going to smell real bad. This will also draw the insects away from your home. Egg wash bait will also attract animals, so be sure to place trap out of reach of dogs, cats, skunks and other animals.

When all of your insects have drowned in the trap and it is full, simply throw away entire trap.


Tuesday, June 25, 2013

DIY remote camera trigger for non-remote cameras

DIY remote camera trigger for non-remote cameras
The remote trigger uses a sandwich box, two hypodermic syringes( which can be found at any veterinary supply) 60 mL syringe and a small 3 mL syringe, connected by 25 feet of vinyl tubing. A pencil head eraser is glued to the small syringe plunger. The small syringe is mounted through a whole in half-inch white PVC pipe and is held in place with O-rings (the PVC pipe is for added stability to the small syringe). A rope can be threaded through the PVC pipe so it can be hung in a tree. The camera is mounted inside the box by threading a tripod mount through a hole drilled in the bottom of the sandwich box. Simply cut a hole in the lid for the lens of the camera. To operate the camera trigger simply move the large syringe back-and-forth to move the small syringe up and down. You could also use a tripod like this one with the sandwich box and mount the camera just about anywhere.

Photos of humming birds taken with rig.

The one nice thing about the rig is that humming birds don't hid from you. Normally humming birds will feed on opposite side of feeder, making it hard to get photos close-up. Original photos were taken with 14 megapixel camera and would be poster size. Re-sizing was done for web publishing and copyright protection. 


Tuesday, April 30, 2013

DIY solar lighted stepping stones


How to make solar lighted stepping stones.


[note:  The glass used in this project is not safety glass and can break under certain conditions. If rocks or other objects strike the glass with sufficient force it is possible for the glass to break creating sharp edges and unsafe conditions. The author of this blog is not responsible for misuse or persons not taking do care and it's information is intended for conceptual purposes only.]
To make your mold  cut off the bottom of a 5 gallon plastic bucket. (note: do not throw away the upper half as it can be used to be used to protect plants and other things, but that is for another blog.) Using a ruler or tri-square cut 3 inches off the bottom of the bucket. This should give you a mold that is 2 1/2 inches to 3 inches deep. Steppingstones need to be at least 2 inches thick in order to support your weight. Be sure and spray a mold release such as vegetable oil on the inside of your mold.(note; do not spray the glass jar as you want the cement stick to the jar. you may even want to sand the outside edges to make the cement stick better, but do not sand the bottom.) Be sure and select jars that are wide-mouth and large enough and deep enough to fit your solar light inside of before you pour the cement.
 Once your cement is poured be sure and tap the edges to remove air bubbles. Wipe any cement sticking to the edges of the lid, as you'll want to remove the lid later. Let your cement set overnight to cure and your stones should be easily removed from the mold. Be sure and take care as the cement will not be completely cured as yet and the stones are still fragile. If it does not easily remove from the mold, then allow the cement to cure a little longer. Set in a tub of water or keep damp inside a plastic bag for at least 5 to 6 days to finish curing. The slower cement cures, the stronger the cement.

I used these glass ball solar lights. The LED is mounted on top of the solar cell, which makes them perfect for this project. using gloves, safety glasses and a screwdriver I carefully pry off the glass ball. Work the screwdriver down the edges loosening any glue and then twisting the screwdriver to pry the glass ball loose. Discard or save for another project the glass ball and tube stand.
                                         Remove your lid from the glass jar. Using a Styrofoam ball I cut off the bottom of the ball to create a flat surface and cut a hole in the center of the ball to mount the solar light in. (Any piece of Styrofoam will work as long as it holds the solar light up right.) I used a low temp hot glue gun as I wanted to be able to remove the solar light if I needed to make repairs. I glue the flat bottom to the inside of the jar lid and tack the solar light to the Styrofoam ball to hold it in place while it is being assembled.            
Once you have your stone assembled, you are ready to set the stone in the ground. Select a site that is free of rocks and other debris. Rocks and other debris could score the glass causing it to break or cause uneven pressure on the stone itself and break the steppingstone. Digg a depression large enough for the stone itself (about a 1/2 inch deep) and a small depression slightly smaller than the diameter of the jar and slightly deeper than the depth of your jar in the center to accommodate the glass jar. Be sure and do not set the stone too deep as you do not want the stone to become buried. Move the stone around slightly and tamp the soil firmly making sure the stone is set firmly and does not rock back and forth. Uneven pressure on the stone could cause it to break, so it is very important that the stone is set firmly before you put your full weight on the stone.
So there you have it, solar lighted steppingstones to light your path or just add accent to your garden or landscaping.
***********************
If solar lights are not your thing or you just want to add color to your stones then a low voltage system may be what you want. The diagram below shows how you might use wine bottles cut in half to make your lighted stepping stones.


You could also use a light set like this and clear bottles to get colored lights. ( note: make sure lights are rated for being buried or exposed to moisture )

Adding marbles or tile or other colorful items is simple. Just lay them in the bottom of the mold and pour cement carefully on top. Keys, tile, marbles and even broken dishes can be used in a mosaic pattern. After it semi_sets use a toothbrush or nylon pot scrubber to clear off cement and reveal mosaic.If I was to use marble or other items again I would try to keep them away from the edges. I did not do so in the one shown above and I got too close to the edges which created weak spots and ruff edges. After it has fully cured I will coat with a clear seal, which will give it a polished look.

Be sure and check out our other blogs and website 


http://patterns44.blogspot.com/


Tuesday, March 5, 2013

DIY rubber stamps from wine corks

Home made rubber stamps made from rubber wine corks.

Simply draw your design and then cut out what you don't want with dremel tool or X-Acto knife.
Once you have your design you can use an ink pen, marker or better yet stamp pad.

Tuesday, July 3, 2012

Candle stick, whats it good for?

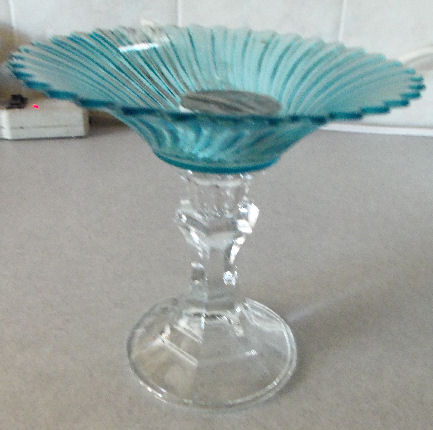
    Often, how we perceive something determines whether it is useful or could be made useful. Take the image below of a couple of plates and the candlestick holder.


    Most people would look at it and think two plates and candlestick, what of it?  But my grandfather used to play a game of what if. The game was rather simple put two or more items together and what do you come up with? A cat and a refrigerator, what do you get? A cat that has a light come on when it opens its mouth. The person with the most unusual combination, wins.  Usually it was just to see if he could get me to laugh. But there would always be some combination that would surprise the both of us and always made us think,"could that actually work?"


    So if you were to use clear epoxy and glue the motive candle dish to the candlestick , what would you have? A candy dish or soap dish?


How about we glue the clear plate to the candlestick , what would we have then? A fancy serving dish or a raised plate to display something on?


How about a bowl and a candlestick ,what would you have then?  A fancy ice cream dish or a goblet for your kids play ? So the next time you're in a dollar store, just remember, a candlestick is not always a candlestick .  And on another note my grandfather always said; " Survival is not always a matter of what you have , but what you can make with what you have.
(NOTE: I always try to use a candle stick with a broad base or glue a flat plate on the bottom to make a broad base. This will help keep your dish from falling over . Also, I have found that clear epoxy works best, not supper glue.)

Saturday, June 30, 2012

Homemade aluminum plant tags


Homemade aluminum plant tags


So you may have wondered why I didn't use aluminum cans?


Aluminum cans are hard to work with and leave sharp edges. That's not to say you can't use them, just be more careful. If you use an aluminum can be sure to bend the edges over to eliminate sharp edges. (note: If you can get cut on a piece of paper, you can get cut on one of these tags.) Sorry in this day and age with all the idiots out there, I have to put disclaimers on everything.
The aluminum I use is easy to work with and it's an aluminum that doesn't normally get recycled. It is not as rigid as aluminum cans, but still holds it's shape.
The plant tags will last for a long time. I have some tags that are over 10 years old. The following is an example of what I put on my tags.

  • Name of plant
  • date planted (moon phases and or planetary alignment )
  • where purchased (note many stores guarantee plants)
  • original location (if moved or propagated)
  • herb, fruit,vegetable
Or

  • Name of plant
  • Ref number
Then have a catalog with the reference number and all the details about the plant that you could not include on the tag.

Other ideas are to use the tags on gifts, as Christmas ornaments, luggage tags, or anywhere you need a nice tag.

Sunday, June 24, 2012

DIY floating solar lights and battery yard lights ideas

Floating solar lights and yard accent lights

These are inexpensive ways to light up your yard.


Note: glass, plastic, or even metal coffee cans with holes can be used to make yard accent lights.

Make your own stepping stone mold

Stepping stones

Make your own stepping stone mold.
Note: things not mention in video.
  1. 1.Stones take up to 5 or 6 days to fully cure and be strong enough to walk on.
  2. 2. When setting stones in place it is very important to set them on smooth level ground. any uneven points or rocks under the stone could break or crack the stone.